Lawn
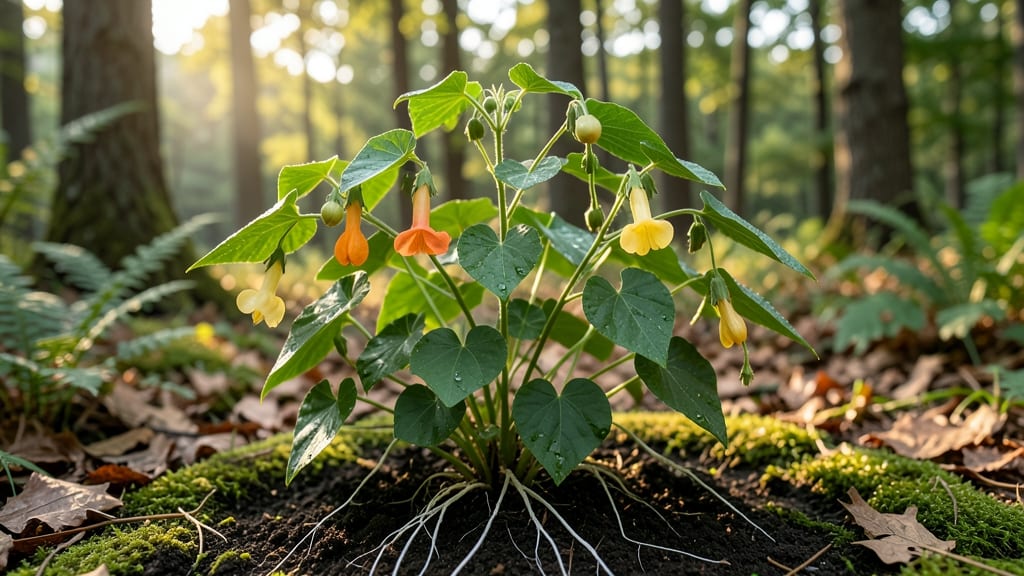
Those explosive touch-me-not seed pods are nature’s way of saying "grow me!"—but catching them before they fly takes patience and a little strategy. 🌿 I’ve learned the hard way that timing is everything: harvest pods when they’re dry but still intact, or you’ll end up chasing seeds across the yard.
The right technique turns these wildflower favorites into reliable garden stars year after year.
You’ll need just a few simple supplies: a pair of sharp scissors, a paper bag for collection, and a sunny spot with well-draining soil. The secret lies in the pods’ 3-5 day window—wait too long, and they’ll pop open on their own, scattering seeds everywhere.
Once harvested, store them in a cool, dry place until planting season, when they’ll reward you with delicate blooms that dance in the breeze.
By spring, you’ll have a meadow of vibrant orange, pink, or white impatiens thriving in shady spots where other plants struggle. The plants grow fast—sometimes too fast—and self-seed aggressively, creating lush ground cover that hummingbirds adore.
Just be ready for the pods’ signature "surprise" when they’re ready to release their seeds.
This method works for garden impatiens, jewelweed, and even native touch-me-not varieties, adapting easily to containers or wildflower patches. The key? Pay attention to the pods’ subtle color shift from green to brown—your cue to act before nature does.
Let’s turn those explosive moments into a garden full of surprises!
📚 In This Guide
- What you need
- Instructions
- Tips and common mistakes
- Wrapping up and next steps
What you need
- ● Touch Me Not (Impatiens capensis) seed pods – 10–20 pods (fresh or dried, collected from mature plants or purchased from a reputable supplier). Note: Each pod contains hundreds of tiny seeds!
- ● Germination medium – 1 part peat-free potting mix or coco coir (sterilized to prevent mold). Quantity: Enough to fill a shallow tray or small pots (2–3 inches deep).
- ● Spray bottle – 8–16 oz, for gentle misting (avoid soaking).
- ● Clear plastic dome or plastic wrap – To create a humidity tent (cut to fit your tray or pot).
- ● Small containers or seedling trays – 4–6 inch diameter pots or cell packs (with drainage holes). Quantity: 1 per 5–10 seed pods.
- ● Labeling tags – Waterproof markers and tags to track planting dates.
- ● Scissors or pruners – For carefully opening seed pods (sterilized with rubbing alcohol).
- ○ Fine-tip tweezers – Optional but helpful for handling tiny seeds.
- ○ Heat mat (optional) – Germinates seeds faster (set to 70–75°F).
- ● Grow lights or sunny windowsill – 12–16 hours of light/day once sprouts emerge.
- ● Garden gloves – Protects hands from mild irritation (some gardeners report skin sensitivity).
- ● Patience! Touch Me Not seeds have a slow germination (2–6 weeks).
- ● Outdoor space – A shaded, moist area (partial sun) for transplanting seedlings.
- ● Knowledge of local regulations – Check if Impatiens capensis is invasive in your region (e.g., banned in some U.S. states).
Step-by-Step instructions for germinating touch-me-not seed pods
Here's my foolproof method for breaking dormancy and getting these finicky seeds to sprout reliably.
🌱 Step 1: Collect and Stratify Seed Pods
Harvest mature Touch-Me-Not seed pods when they're fully brown but still intact. I store them in a paper bag for 2-3 weeks at room temperature to complete any residual drying process. This mimics natural conditions where pods release seeds only after full maturity.
After drying, place the pods in a sealed plastic bag with a damp paper towel. Store in your refrigerator's crispier drawer for 6-8 weeks—this cold stratification mimics winter's natural dormancy period. Check weekly for moisture; if the towel dries out, mist it lightly. You'll see the pods begin to split open naturally after about 4-6 weeks.
💧 Step 2: Extract and Prepare Seeds
Once the pods open, carefully extract the tiny seeds using tweezers. I work over a white paper plate to spot the 1/16-inch seeds against the background. These seeds are incredibly lightweight—don't blow them away! Place them in a small container with a moistened paper towel and cover with another towel.
Seal the container with plastic wrap and store at 65-70°F for 7-10 days. This pre-germination soak softens the hard seed coat. You'll notice the seeds begin to plump slightly and develop a tiny white root tip—this is your signal they're ready for planting. Never let the towel dry out during this period.
☀️ Step 3: Sow Seeds in Ideal Conditions
Fill shallow trays with sterile seed-starting mix and barely cover the seeds—just press them into the surface with your finger. These seeds need light to germinate, so don't bury them. I use a fine mist spray bottle to keep the soil surface consistently moist but never soggy.
Place the trays in a warm, bright location receiving indirect light. A south-facing window with sheer curtain works well. Germination typically occurs in 14-21 days, but be patient—some seeds may take up to 30 days. You'll see the first true leaves emerge as delicate, rounded shapes.
🌿 Step 4: Transplant and Establish Seedlings
Once seedlings develop 2-3 sets of true leaves (about 3-4 inches tall), transplant them to individual 2-inch pots filled with the same seed-starting mix. Handle them carefully—the stems are fragile. I use a toothpick to gently loosen the soil around roots before transferring.
Keep seedlings in partial shade for the first week after transplanting to reduce stress. Gradually introduce them to full sun over 7-10 days. Water from the bottom by placing pots in a shallow tray of water for 10-15 minutes—this prevents fungal issues that often plague these sensitive seedlings.
⏰ Step 5: Acclimate and Plant Outdoors
Two weeks before your last frost date, begin hardening off seedlings by placing them outdoors in a sheltered, shaded spot for 1-2 hours daily. Increase exposure gradually, protecting them from direct wind. You'll notice the leaves develop a deeper green color as they adapt to outdoor conditions.
Plant outdoors when nighttime temperatures stay above 50°F and all danger of frost has passed. Space plants 12-18 inches apart in well-draining soil. Water deeply at planting and maintain 1 inch of water weekly during establishment. These plants thrive in full sun to partial shade and prefer slightly alkaline soil.
Tips & tricks for perfect touch-me-not germination
These insider strategies will help you coax even the trickiest Touch-Me-Not pods to sprout with confidence.
Stratification Precision: The 6-8 week cold stratification in Step 1 is non-negotiable for breaking dormancy. I've found that using a refrigerator's crispier drawer maintains consistent 35-40°F temperatures—critical for mimicking winter conditions. Place a small thermometer in the bag to verify temps stay within this range. If your kitchen is particularly dry, add a second damp towel to maintain humidity without creating mold conditions.
Seed Extraction Technique: When pods finally split open in Step 2, resist the urge to rush. Use a fine-tip paintbrush instead of tweezers to gently coax seeds out—this prevents crushing the delicate 1/16-inch seeds. I work over a white glossy paper plate (not newspaper) to spot seeds against the background. A magnifying glass helps identify the tiny seeds that might otherwise be missed during extraction.
Germination Environment: The warm, bright location specified in Step 3 requires careful balance. While south-facing windows work well, avoid direct sunlight which can overheat trays. I place mine on a seedling heat mat set to 70°F during germination—this creates ideal conditions without requiring constant monitoring. A clear plastic dome over trays helps maintain humidity while allowing light penetration.
Transplanting Strategy: During Step 4's transplanting, I recommend using a toothpick to create small divots in the seed-starting mix rather than digging holes. This prevents compacting the soil around fragile roots. After transplanting, I mist seedlings with a diluted seaweed solution (1 tsp per quart of water) to boost stress resistance during the first week in partial shade.
Pro Tips for Touch Me Not Seed Pods
- These insider strategies will help you coax even the trickiest Touch-Me-Not pods to sprout with confidence.
- Stratification Precision: The 6-8 week cold stratification in Step 1 is non-negotiable for breaking dormancy.
- Seed Extraction Technique: When pods finally split open in Step 2, resist the urge to rush.
Frequently asked questions
about Touch Me Not seed pods—here’s what you need to know before diving into your wildflower meadow project!How do I know when Touch Me Not seed pods are ready to harvest?
Harvest the pods when they turn light brown and begin to split open naturally—usually in late summer or early fall. Avoid harvesting if they’re still green or if rain is forecasted, as moisture can ruin the seeds. Pro tip: Collect them on a dry, sunny day for best results!
How long does it take for Touch Me Not seeds to germinate?
Germination typically takes 14–30 days under ideal conditions (moist soil, 60–75°F, and indirect sunlight). Be patient—some seeds may take longer, especially if stored improperly. Pre-soaking pods in water for 24 hours can speed up the process!
Can I plant Touch Me Not seeds directly in my lawn without removing grass?
While possible, it’s harder for seeds to establish through thick grass. For best results, scarify the soil or use a lawn corer to create small holes (1/4" deep) for seeds. Thin grass competition increases survival rates. Consider spot-treating areas first for a cleaner meadow look!
Will Touch Me Not attract bees or other pests?
Yes! These pods are a bee magnet and support pollinators like butterflies and hummingbirds. However, they’re not invasive pests—they’re beneficial plants. If you’re concerned, plant them in clusters away from high-traffic areas to avoid accidental disturbances.
What should I do if my Touch Me Not seeds don’t sprout?
Check these troubleshooting steps:
- Soil moisture: Keep soil consistently damp (not soggy) during germination.
- Light: Ensure seeds get bright, indirect light—direct sun can dry them out.
- Freshness: Old seeds (over 1 year) may have lower viability. Test a few in a controlled environment.
- Stratification: Some seeds need a cold period—try refrigerating them for 4–6 weeks before planting.
If all else fails, try a new batch or mix with faster-germinating wildflower seeds!
Wrapping up and next steps
Discovering the magic of touch-me-not seed pods opens up a world of effortless wildflower meadows! These resilient pods are nature’s way of ensuring vibrant, low-maintenance beauty—just collect, dry, and scatter.
Whether you’re a gardening novice or a seasoned green thumb, this simple hack transforms your outdoor space into a thriving ecosystem with minimal effort.
Ready to grow your green thumb? 🌱 Start small—try a patch in your backyard or a sunny corner—and watch as your wildflower dreams take root. Happy planting!